Frugal Woodworking

Woodworking Tips for Affordable Woodworking

Detail Sander Toothbrush

This idea comes from Jimthecarver at Lumberjocks.  He uses self-adhesive sandpaper on old battery operated tooth brushes.
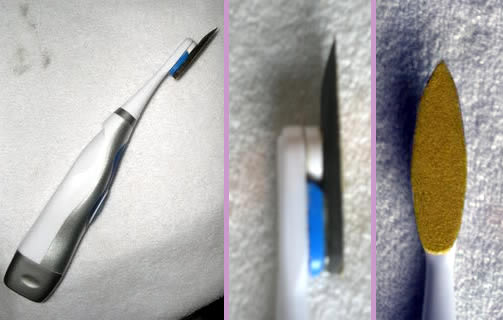
detail sander toothbrushSome of these toothbrushes have rotationally oscillating heads and some oscillate front to back.  Either way, they can be a useful tool for sanding in tight spaces.

This is a great example of re-using and re-purposing a tool.  When they get too scuzzy to be used on your teeth anymore, trim the bristles off with a knife or razor blade, then stick the sandpaper down to one of the moving parts.   To add a bit of control, it is best to epoxy a piece  shaped wood or plastic to one of the moving parts.  That way the sandpaper is fully supported.

Many of the toothbrushes have exchangeable heads so you can prepare a few different shapes that suit your detail sanding needs.

There are a couple of tutorials on making similar toothbrush detail sanders, this one using double sided tape and this one using sanding sponge.

Reconditioned Tools

I buy a lot of my power tools as reconditioned.  My experience has been positive.  In the case of reconditioned tools you are dealing with a tool that has been looked at and evaluated by a human at the company, which is more than can be said for the new tools which are packed by a robot.  The reconditioned tools usually carry the same warranty as the new tools so they are a safe investment of your woodworking dollars.

Amazon has great prices on reconditioned tools and in many cases they qualify for free shipping.  Bosch, Milwaukee, Ryobi and many others sell their reconditioned, CPO tools directly on Amazon.  Take a look at Amazon’s Reconditioned Tools.  You can save a lot of money and get some great performing tools.

Lifetime Guarantee Tools

Investing in tools that carry a lifetime warranty can be a good way to protect your investment and as a result, remain frugal.   The problem I have run into on occasion is that the brand name that carries the guarantee sometimes gets warn off or falls off the tool with use.  When this happens it becomes difficult to exchange it for a replacement tool if it breaks.

It becomes worthwhile to protect that label or other markings in order to protect your investment.

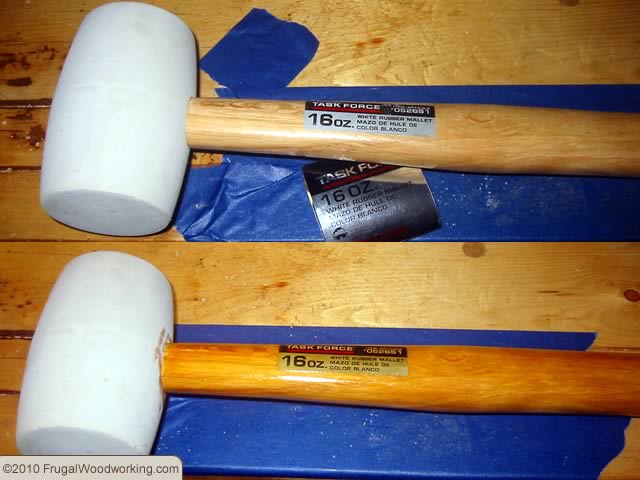
shellac over label

A couple of quick coats of shellac over the handle and label, protect the brand on the label and protect the warranty.

Here are some tips that I use to protect the branding of the tool in order to protect my investment:

  • Be proactive. Take a digital photo of the tool while it still has the branding on it.  Save it on your computer in a folder dedicated to your tools.  This also helps if you ever need to file an insurance claim.
  • If the brand name is printed or painted on a tool’s wooden handle, put a coat or two of polyurethane over it.  Use spar polyurethane if they are outdoor tools.  This will help keep the branding from getting warn off.  Shellac can be used for indoor tools if you prefer.
  • If the only branding is on a printed label, cover it with a few coats of poly or shellac.  You should spot test it first as the mineral spirits in the poly may damage the printing on some labels and the alcohol in shellac may damage others
  • If the branding is printed , but not etched, on a metal portion of the tool and is not on a functioning surface of the tool then a bit of boiled linseed oil can help protect it from wear and rust. (Don’t apply it too thick or it will become gummy.  Thin coats are better.)
  • If the name is etched into the metal, then just keep the area protected from rust.
  • A file folder in the workshop for receipts can also help.

Tips for Energy Efficient Woodshop

Electrical energy costs money, so when we put it to work in our shop it costs money.  It is inevitable.  The question becomes how can we minimize the cost of electricity in our shops.  Here is a list from a forum plus a few of my own thoughts on it.

  1. Don’t use a power tool when a hand tool will do it faster.  Or just don’t use power tools.
  2. sharp tools – results in less work (work from an energy standpoint, work done = energy used)
  3. thin kerf blades – results in less work needing to be done
  4. turn tools off when done. (that tip  is obvious)
  5. let tools cool – a hot electric motor wastes more energy than a cool one
  6. clean sawdust from motor casings – sawdust acts like a blanket and keeps the heat in and prevents air from getting through, resulting in a hotter motor.
  7. 220V as opposed to 110V causes less loss due to heat (wasted energy). Theoretically, yes 220V x 8A is the same power rating as 110V x 16A but when it comes to heat loss in a wire, Energy is related to the square of the current, so keeping current low results in less loss.  Energy Loss in a wire = I²Rt  A motor is lots of long wire, so this can be significant.
  8. Use corded tools rather than battery powered. The batteries waste more energy in use due to the lower voltage, they waste energy in chemical heat, and they waste it on the charging end too. The only gain is if you can charge them at someone else’s shop.
  9. When you must use extension cords, use the largest gauge you can and shortest cord to reduce energy losses in the wire.
  10. When wiring the shop, larger gauge wire (lower number) is more efficient and less dangerous than the thinner stuff. Sadly with the recent rise in the price of copper it makes people more likely to use thinner gauges.
  11. If you have older buzzing, humming, slow to start shop lighting, replace them with electronic ballast T-8 fixtures and bulbs.  More efficient and easier on the eyes and instant on.  Due to the electronic ballast, the bulbs last longer too.

Wisdom and Humor at Flea Markets

I ran across this shared on a forum.  It cracked me up and taught me a lot at the same time.

This collection of tips for dealing with your significant other and sellers at a flea market when buying old tools contains a lot of wisdom.  It also is pretty tongue-in-cheek funny.

Repeat after me, I am not a collector, I am not a collector, I am not a collector  LOL

Survival Tips For the Beginner Galoot Including A Primer On Flea Market Tactics

Bench Brush – snow no more

For those in the snowbelt, a snow brush for the car is a necessity.  Mostly I find that the brush and scraper combination lasts for maybe two seasons at best.  After a few years the scraper ends up dull or chipped and is no longer good for scraping ice off your car windows.  The brush portion however is usually in pretty good shape.

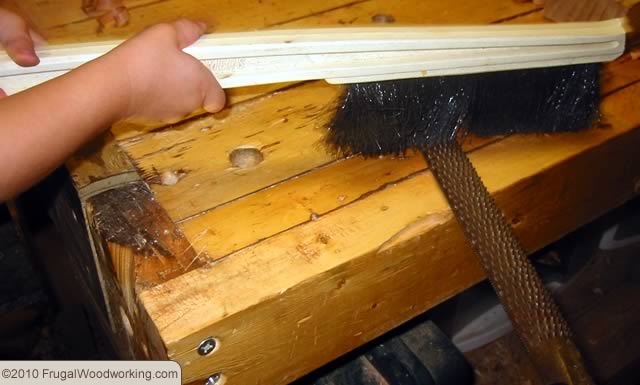
Rather than throw that beat up snow brush in the landfill, re-purpose it for the workshop.    The stiff bristles and the length of the brush make it perfect for cleaning off a workbench or table saw.  Just use a hack saw to cut the scraper portion off the end.

Bench brush for the workshop

This old snow brush witht he scraper cut of makes a great bench brush

The bristles are often fairly stiff so I find that the narrow rof of bristles is great for cleaning the debris out of my rasps.

great brush for cleaning a rasp

Clean the sawdust out of the teeth of the rasp

Another reason I like re-using these old snow brushes in the workshop is that they are usually flat so you can hot glue a neodymium magnet to the side and stick it to the side of your table saw, drill press, band saw, miter saw or other large power tools that need a good sweeping.

Dovetail Razor Saw Review

It’s hard to believe you can get a new dovetail saw with great performance for under $10 but the little razor saw from Zona Tools is getting a great reputation.  Here is a great review of the Zona Razor Saw that compares it stroke by stroke with other dovetail saws.  Accurate and precise cuts with a micro kerf seem to be its strong points.

Thin Kerf Rip Blade for under $20

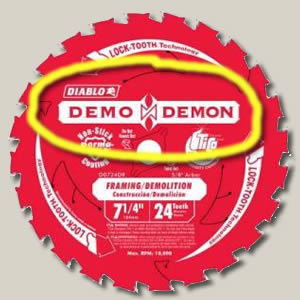
This review appears on Lumberjocks for a Freud  Diablo Demo Demon D0724DK 7-1/4″ 24T circular saw blade, but used in a table saw.  It is only a 7-1/4″ blade so it has a limited height, but the 1/16″ thin kerf and smooth cut seem to be perfect for ripping up to 1″ stock.  This blade sells for around $15 which is a fraction of what other thin kerf table saw blades typically cost.

You can read the review here and buy them on Amazon.

Freud Diablo Demo Demon as a rip blade

Freud Diablo Demo Demon as a table saw rip blade

Quick Clamp Restore

There is nothing worse and little more dangerous than a clamp that can’t be relied upon to do its job.  I have a pair of Craftsman Quick Clamps that I’ve had for almost 20 years.  Over time, they have lost their ability to clamp tightly.  The mechanism would just slip.  I believe the bar has become too polished and the clutch plates inside too smooth.  And no, the Craftsman Lifetime guarantee does not apply to clamps, somehow Sears does not consider them to be hand tools.

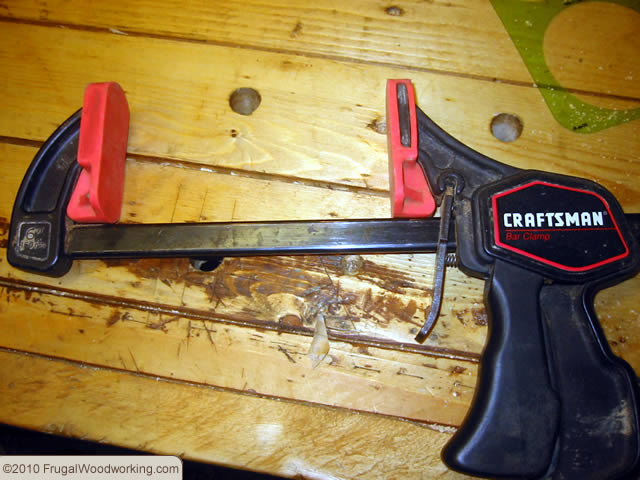
quick clamp repair

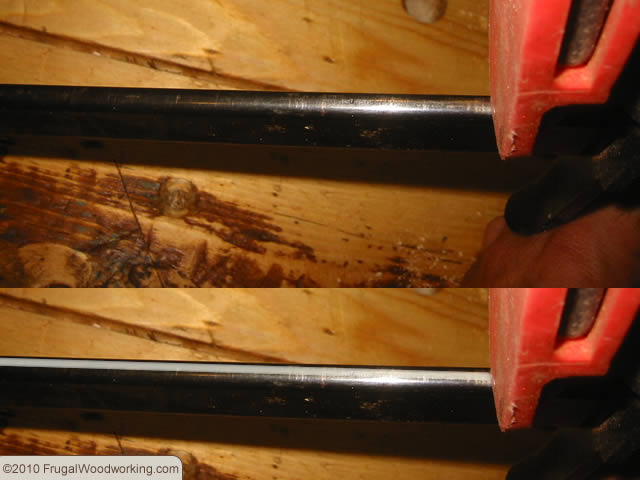
No longer able to hold securely, this quick clamp was in need of repair.

I just gave mine a new lease on life and it cost me nothing but a few minutes worth of time.  Here is what I did.  I opened the clamp as wide as it would go, then took a file and made a few passes  over the top and bottom surface of the bar.  I then closed the clamp and did this again to any area that was originally hidden by the clamp head.  You are trying to create just a little flat ridge on the top and bottom surface of the bar.

quick clamp repaired

With both the top and bottom of the bar filed, the clamp now holds tight.

After doing this with all of my clamps, they now hold tight and are able to be clamped down harder than they used to.  The roughing up with the file seems to give something for the clutch plates inside the clamp to grab onto.

Preserving the initial investment in your tools is a big step toward remaining a frugal woodworker.

DiggersList for Lumber and Tools

Frugal and Green often go hand in hand.  In an effort to reduce the amount of construction extras from going into landfills, DiggersList.com offers free listings for home improvement and construction classifieds for homeowners, contractors and do-it-yourselfers.  Like CraigsList they are broken down by State and City.  So far there are only a few cities, but that is likely to grow.

There are separate categories for lumber and tools.

Unfortunately, the website does not currently offer RSS feeds so it makes it difficult to subscribe to a category or a search.

Sharpening Works and Won’t Break the Bank

This website has been around a long time.   It is a little tough to navigate, but it is worth digging through.  It has a wealth of sharpening wisdom based on actual measured results rather than folk-lore.  Aside from all the great information, there are tips and jigs which end up saving a lot of money and the recommendations for sharpening abrasives are very affordable.

www3.telus.net/BrentBeach/Sharpen/index.html

I like his suggestion of using a Norton Crystolon Bench Stone for grinding the bevel.  They are fast, inexpensive and stable.  The 11-1/2″ length allows for longer , more effective strokes. His recommendation for using 3M Imperial sandpaper for final sharpening is good and cost effective.

No wining over wasted polyurethane

This is a brilliant tip for not wasting your investment in polyurethane by having to throw it away.  Don’t let it go bad and you won’t need to throw it away.   Store it in boxed wine system…. and you get to drink the wine too.

americanwoodworker.com/blogs/tips/archive/2009/10/20/finish-on-tap.aspx

Sharpen your own planer and jointer blades

One way to avoid spending money on new planer or jointer blades is to keep using the ones you already have.  Unless they are severely damaged, they can be sharpened without too much effort.

Here is an example of a jig to make sharpening consistent and easy.  It requires only a block of wood and a table saw to make it.

americanwoodworker.com/blogs/tips/archive/2008/07/07/Simple-Sharpening-Jig.aspx

Logs to Lumber with a Bandsaw

If you already have a bandsaw, it can be pretty easy to create a sled or jig to allow you to turn logs into dimensional lumber. This can be a great way to turn found wood into nearly free lumber.
Here are two simple approaches. The size of the log is limited by what you can safely lift and support on your bandsaw, and the resaw capacity of your bandsaw.
Here are a couple of easy to build jigs.

This first one is really simple, but it does rely on your bandsaw’s rip or resaw fence which may be too much to ask of the fence for large logs.

bandsaw sled
americanwoodworker.com/blogs/tips/archive/2009/01/29/Simple-Lumber-Maker.aspx

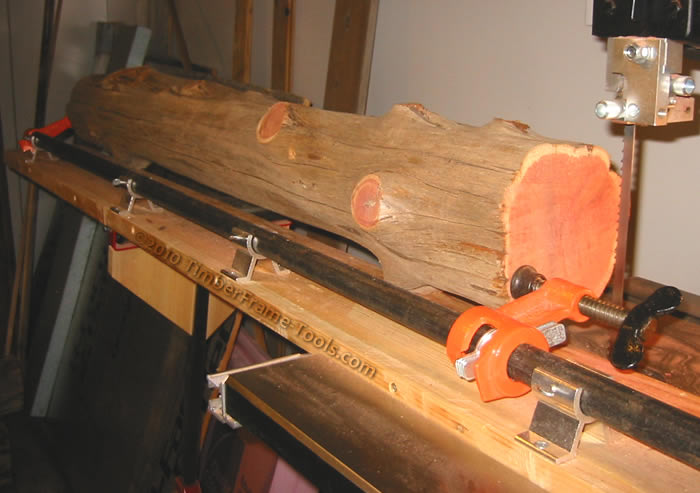
This next one is a little bit more complicated using a pipe clamp, but it requires only a miter slot on your bandsaw table.

Bandsaw mill sled
www.timberframe-tools.com/tools/bandsaw-milling-sled/

When milling logs, a good resaw blade is key to getting good results.  I’ve had excellent results from my Woodslicer blades, but if your logs are less dry, you may want to go with a blade designed for cutting green wood.

Handmade Marking Gauge

It is easy to save money in the workshop by making your own tools.  This is especially true when the tools are simple in design.  This simple marking gauge is worth checking out.
frugal handmade marking gauge

I think that upgrading the needle to a nail filed to a cutter blade shape then heat treated might be a good idea, but maybe this needle works well enough as it is.

Here is another example of a shopmade marking gauge
americanwoodworker.com/blogs/tips/archive/2009/01/29/30-Minute-Marking-Gauge.aspx