Frugal Woodworking

Woodworking Tips for Affordable Woodworking

Super clamps for panel glue-ups

These clamps are awesome. They are simple to make and cost less than $10 for a pair. For panel or tabletop glue-ups they hold your boards together and they hold them flat. No store bought clamps can beat them for gluing panels or tables.

Parts list for a pair of 48″ clamps:

  • 1 2″x4″x8′ Cut it into 4′ lengths (or however long you need them). Rip them down the middle of the 4″ dimension.
  • 4 bolts that are roughly 6″ long and 3/8″ in diameter. They should have an un-threaded section no longer than the thickness of of the two pieces you ripped to make the two halves of the clamp. (~3 1/4 “)
  • 8 matching washers
  • 4 matching wing-nuts


Thanks to Sergio Acuña Padin for producing this video and sharing the idea.

Simple custom dados with circular saw

Matthias Wandel comes out with some amazing modifications for tools and techniques. This one however is incredibly simple and only requires a few scraps of wood and a pair of clamps to turn a simple circular saw into a custom width dado maker. You can spend a lot on special dado blades for table saws or router with a straight bit and some guides, but this method is simpler and the results are very close to the same. Very little is sacrificed by using this frugal dado making method.

Effective Marking Gauge for Under a Dollar

Paul Sellers brings this great video for how to make a marking gauge for under $1.  It is simple to make, yet brings a high degree of precision for marking dovetails and dado depths.

Tools needed:

  • saw
  • drill
  • screwdriver
  • sandpaper
  • file
  • chisel

Materials:

  • 1 steel flat-head screw 1 to 2″ long. Preferably slotted, rather than Phillips or square drive.
  • 1 scrap of wood roughly the size of a can of tuna-fish.

Watch Paul show you how its done without spending money on fancier marking gauges, beading tool, or scratch stock.  The simplicity is awesome, and so is the realization that this can be fine tuned more than any of the expensive marking gauges available for purchase.

And here is a short follow-up video where Paul addresses even more that can be done with his simple beading tool.

Affordable Eye Protection

I have been using Fastcap Safety glasses with 2.0 bifocal lenses in the shop.  They have served me well and more than ever I need the bi-focal boost to see the close-up stuff better.  Recently the nose piece on the Fastcap split and became un-repairable (I think this is no longer an issue on the newer version.)   But when I checked Amazon I also found these Crews Bearcat glasses with 2.o bifocal for half the price (under $5) as long I as I included them with some other purchase.  They are made by MCR Safety. I decided to give it a shot.

It turns out, for me they work out pretty nicely.  The earpiece length is not adjustable like the Fastcaps are, but they happen to fit me.  I am happy with the clarity of the lenses and how the bifocal lined up for me.  I’ve been using them for a couple of weeks now without complaint.  According to the wrapper, they meet ANSI Z87 and are 99.9% UV Protective.  Crews is a US company, but the glasses are made in Taiwan


Tools Sources for the Tight Wallet

There is an art and a bit of luck to acquiring tools from garage sales, second-hand shops and e-Bay.  If that does not work for you and you are opposed to buying cheap knock-offs from Harbor Freight,  give Harry J. Epstein Company a try. They handle closeouts and blemished units from many companies and emphasize American Made whenever possible.

If all that fails, then it is often hard to beat Amazon especially for their product reviews.  Often part of being frugal is simply learning what you can about a product before you buy it. Of course it can be helpful to filter your Amazon tool search by ‘blem’ for blemished, or factory second tools or factory refurbished tools.

Practical Woodworking Guru

A practical woodworker uses what is efficient in both time, effort, and money.  I have really been enjoying the training videos offered by Paul Sellers.  He is not promoting the fanciest new tool and he promotes methods that give you the most impact for your effort and money.  Try out some of Paul Sellers videos and I guarantee he will pass on some practical knowledge that will save you time and money.

Inexpensive Versatile Wood File

A laminate file is not just for plastic anymore.  They have a lot of attractive features for woodworkers.

A laminate file is not just for plastic anymore. They have a lot of attractive features for woodworkers.

A wood file, or several of them in various sizes, is handy to use.  Often times a metal file that has grown too dull for metal work can still serve out a nice lifetime as a wood file.  In case you are looking to have a new file that works well in several situations, Robert Lang at Popular Woodworking has posted a nice article about using a common “plastic laminate file” as a wood file.  He is right on target from the frugal woodworking side of things.  The plastic laminate file is:

  • affordable
  • has a coarse side
  • has a fine side
  • 1 safe edge – so you can file up against an edge (like a tenon shoulder) without damaging the adjacent face
  • a molded  handle (as opposed to a tang that you have to purchase or make a handle for)
  • a hole for hanging
  • Of a length that is long enough to be effective.  (Use long strokes, just like when using a hand saw.)

None of the woodworking stores seem to carry them.  You can find laminate files at Amazon or Bob recommends looking in the big box stores back by where the sheets of laminate are held.


Chisel Protectors

Here are three approaches to chisel protectors that work:

  1. Free – Bottle caps sliced on edge. See it on LumberJocks
    PROS: variety of widths, visible tips
    CONS: not very pretty, cumbersome
  2. Custom width edge protectors made with blue painters tape and plasti-dip.  See it on Popular Woodworking  A variation on this is to use mold-able silicon like Sugru.
    PROS: variety of widths, color codeable, secure fitting
    CONS: 1 can of Plasti Dip is more than you need for just chisel guards
  3. Purchase the set of plastic ones
    PROS:  No shop time required, they look good
    CONS: You are stuck with the size and shapes in the set.
  4. Use an assortment of vinyl tubing cut to length
    PROS: secure, protective
    CONS: not pretty, can allow sharp tip to protrude from end of tube or item to enter the tube
Sources for the products:

Here is the video of making the Plasti Dip Chisel Guards

Kerfmaker from Scrap Wood

This idea is just too simple.  A custom kerfmaker for use on a tablesaw that costs next to nothing and takes only a minute to make.  The end result is a Kerfmaker that is every bit as accurate as the more expensive version.

Don’t get me wrong!  The original Kerfmaker from Bridge City Tools is quite brilliant, and would pay for itself in both accuracy and time savings if you made a living making furniture.  However for the hobbyist, it can seem a little pricey.   LumberJock Rance has a great approach to this that I will use when I need it.  My fear is I will not remember how, when I need it, so I am posting it here for easy access.

Disposable Kerf Maker

It uses only two things. :

  1. Two scraps of wood
  2. Two pieces of double sided tape

Estate Sales

Estate sales can be an affordable way to find used woodworking tools in your area. They are especially helpful if you are looking for older wood working tools. One site that I find helpful is EstateSales.net.  You can have the site notify you of new sales in your area, or you can search for specific items.   It would be more useful if the search or the regions had RSS feeds which are lacking at the moment.

estate sale woodworking tools

You never know what you'll find at an estate sale.

Parallel Clamps

This solution to making parallel clamps out of a few strips of wood and 2 screw per clamp is pretty impressive.  Amazingly simple, yet seem to be quite strong.

Thanks to the blog at theapprenticeandthejourneyman.com for putting together this video.

Inexpensive push blocks

Push blocks are a safety feature that are recommended on jointers, router tables, shapers and table saws.  They keep your hands away from danger and give you a solid hold on your workpiece.  This tip on Lumberjocks is a great one for using rubber grout floats as inexpensive push blocks.  For a few bucks a piece they are secure and consistent.

grout float push block

Fix for Wobbly Pegboard Pegs

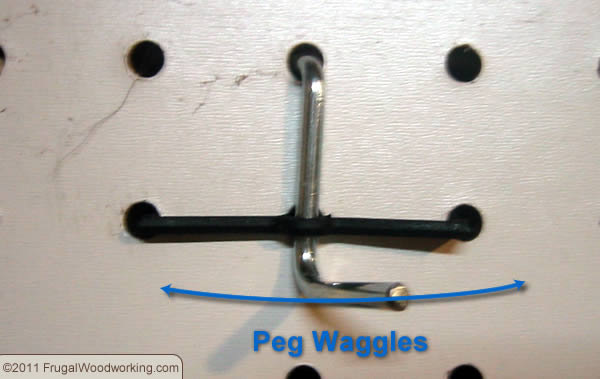
Pegboards are a funny thing. Nearly every workshop has some. The problem is not so much the pegboard, as the pegs themselves. Sure the pegs are great because you can move them around, but that is part of the problem, they wobble side to side when you try to hang a tool on them. The retainer clips help keep them from falling off the board, but do nothing to keep the pegs from wobbling.

The pegboard peg waggles.

The clip does nothing to prevent the side to side waggle of the peg.

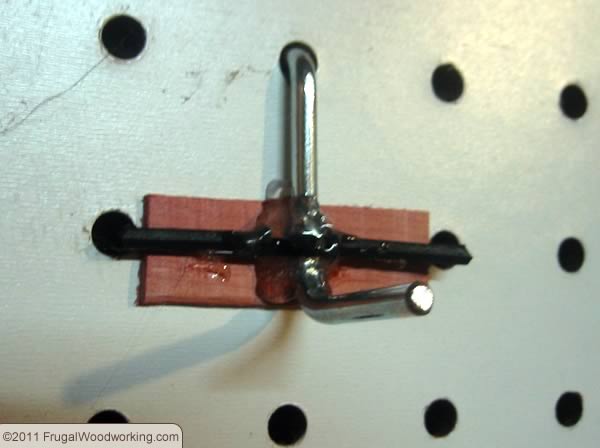
Pegs that waggle are an annoying problem, but they are easily fixed with a bit of hotmelt glue and thin piece of wood.

pegboard peg fix

With a bit of hot glue holding the peg and the retainer clip to a small piece of wood, the peg is secure.

Simply hang the peg on the pegboard and slip a small strip of wood behind the clip, then press the clip in place. Now squeeze in a glob or two of hotglue to hold the peg to the clip and the wood. Then you are all set. The peg can still be moved to other parts of the pegboard without any trouble, but once it is there, it wobbles no more.

Better grips on clamp handles

Usually in the middle of a project I realize that my grip is not what it used to be.  Unfortunately I realize that right when I need it the most.  In the midst of a glue-up I sometimes discover that I can’t tighten the handles of my clamps down the way I used to, at least not without more discomfort in my hands.  Here are some tips I’ve found for improving clamp handles.

Clamp Handle Wrap Products

Make That Gimlet Cut

Rob at Heartwood has a great tip on improving the performance of relatively inexpensive gimlets.  It turns them from an ineffective tool, to a useful non-drill method of starting screws.

visit >> Improving Gimlets at Heartwood Blog